Understanding the merge block

In Simulink, the merge block is documentation states

“The Merge block combines its inputs into a single output line
whose value at any time is equal to the most recently computed
output of its driving blocks.”

As clear as that statement is there are still questions about the behavior of the merge block.  This post attempts to clarify those questions.

Quiet night

The first and most common question is “what happens when none of my subsystems are enabled/triggered?”  In this example, we have 3 subsystems “A”, “B”, and “C” which are enabled when the driving signal is equal to their enumerated namesake.  The output from the subsystems is a simple enumerated constant equal to the subsystems name.  E.g. subsystem A outputs a value of “A”…

merge_1

However, the way I have configured the driving signal it includes an enumerated value of “abcs.D” in addition to the A,B,C values.

mergeOut

In this example when the value of the driving signal is equal to abcs.D none of the subsystems are enabled.  In this case, the merge block simply outputs the last value input into the system.

Default merge subsystems

In the example above there is an unpredictable behavior due to the lack of a “default” subsystem.

download.jpg

merge_3

The “Default” subsystem should execute every time step when the other systems are not running.  In this example, it is enforced through simple logical operations.

Multiple execution

In versions of Simulink from 15a and on (it could be earlier but that is the latest I had installed on my laptop) if you try and execute more then one subsystem during the same time step you will get an error message

merge_2In this case, I tried driving my two subsystems “LiveCat” and “DeadCat” with a “Schrodinger Waveform”™ vector.  When the vector was in the “Both” mode then both subsystems were active and the error message was triggered.

wave


My consulting 7 commandments

As a consultant, there are N rules that I hold for myself and my customers.

1: Thou shall ask questions

At all stages of a consulting engagement, including the pre-engagement work, asking clarifying questions is critical to a project success.  I have seen projects fail due to consultants not wanting to ask questions (e.g. they don’t want to look like they don’t understand) and from customers not wanting to answer questions (they want to keep their information “private”).

download

2: Thou shall know the limits of your ability

I love learning new technologies and sciences.   I will take on projects where I am stretching myself; I will not take on projects where am pushing beyond my abilities. I will either recommend a co-worker or another company.download.png

3: Thou shall provide honest estimates

An honest estimate takes into account the information provided by the customer and the industry/domain knowledge of the consultant.  The estimate should provide a list of assumptions baked into the proposal; the expected deliverables and the limitations of the estimate.download.jpg

4: Thou shall communicate regularly

Once a project has started regular communication with the customer is essential to guarantee that the project remains on track and that the customers needs have not changed.regex_shirt_1_1024x1024.jpg

5: Thou shall teach

As I work with a customer I am always teaching them what I am doing, both the how and the why.  If at the end of a consulting engagement my customer does not understand what I did then I consider that failure.images.jpg

6: Thou shall be around afterward

After a project is completed, even after the budget has run out, I am still available to answer questions that arise.  I do for three reasons.  First, there are always issues that arise 2 ~ 3 months down the road.  Second, documentation, no matter how good, can always be clarified.  Third, it is just polite.

you-hang-around-ill-go-ahead.jpg

7: Thou shall get to know the client

On most projects, I will work with the client for 200+ hours.  Getting to know you, my client, makes for more enjoyable working conditions for everyone involved.

images.jpg

Clarity of communication: handoffs

In a traditional software design process, there are multiple handoff points were artifacts are given from person-to-person, group-to-group.  These handoffs are places where errors can be introduced into the product.

In general, there are two types of handoffs; transformative and non-transformative(1).  With a transformative handoff, the artifact is changed; either through updating of existing material or translating it from one form to another (for example taking textual requirements and writing C code)

Each handoff introduces a potential error point where mistakes in translation can occur.  The most common errors occur during translation handoffs but they are common even in update events.

Why do handoff errors occur?

Errors are introduced in the development cycle due to imprecise communication.  This miscommunication can be compared to the errors introduced in the party game “Telephone.”  Even the best intentions cannot prevent them.

How do you minimize handoff errors?

If handoff errors cannot be fully prevented how then do you minimize them?

  1. Minimize translation handoffs:  As covered in previous posts use of models enable handoffs between roles using a single source of truth.
  2. Build verification activities into translation handoffs: Verification of the design intent between transformative handoffs.  Use of test suites and verifying against requirements.  (Note: this requires that the requires are written in a clear fashion)
    Note: Regression testing can be used for update handoffs.
  3. Minimize hands offs:  Through the use of models the total number of handoffs in the development process can be reduced.
  4. Stress clarity in communication:  Clear communication begins with well-written requirement documents and continues with documented models.  Send engineers to classes on requirements writing and reading, enforce coding standards that promote understandable models.

Final thoughts

Communication errors will occur during the design process; our objective is to minimize them.  They range from famous, like the Mars orbiter metric/English crash to the more prosaic, like recipes that write “salt to taste” (2) in giving a recipe.   By stressing the 4 ways to minimize handoff errors the total development time and costs can be minimized.

Notes

  1. Non-transformative hand offs include things such as design reviews or migration of code into a compiler chain.
  2. The problem with “salt-to-taste” is that many modern cooks avoid the use of salt and, as a result, end up with bland food.

Empowering engineers to adopt MBD

What does it mean to empower engineers? A base definition found through ever handy Google, is

impPower2

Empowering engineers to adopt Model-Based Design fitsGM-NASA-RoboGlove-03_opt into this base definition like a hand in glove.   But how do we extend beyond the base solution?  So what can we do to tailor the adoption empowerment?

Support phase 1

As already covered, the Model-Based Design roadmap first phase is an initial research and proof on concept phase.  How is this supported?  There are three methods of support

  1. Education:  Both formally through training and informally through readings such as this blog.
  2. Time: The initial research stage takes between 1 and 3 months depending on the existing level of knowledge.  Successful adoption of MBD processes requires dedicated time by the establishment team.
  3. Failure: The scope of the initial adoption phase should not be on a critical path.  The establishment team needs the leeway to make mistakes during their initial investigation.

Ongoing support

The ongoing support consists of 3 factors

  1. Specialization of tasks: engineers and software architects should be allowed to work in their domain.  Requiring everyone to learn all tools and steps in the workflow creates an unnecessary burden.
  2. Provide the required tools: Not every engineer needs every tool.  However, identifying the tools required and providing them to the engineers will enable them to quickly do their required work
  3. Automate: where possible automate common tasks.  Nothing is more demotivating than the requirement to perform repetitive tasks.

see-say-do-banner.png

Final thoughts

Empowering engineers to adopt and use Model-Based Design is little different from any other process.  The central difference is in the initial adoption phase where the Education, Time and Failure requirements exist.

Notes:

I have no connection to Santa Cruz college.  I just couldn’t resist the “slug support team” for part of this post.

Fault analysis

By some estimates, fault detection and the subsequent error handling averages between 30% and 50% of the algorithmic code for embedded systems.  However, despite the high percentage of code devoted to fault detection the literature devoted to this topic is less commonly read.

In a previous video post, Fault Detection, I looked at common patterns for fault detection algorithms and decomposition between fault detection and control algorithms.  In this post, I will cover the validation of fault detection algorithms.

Requirements: the validation starting point

To begin, the fault detection algorithm should have an independent requirement specifying what conditions constitutes a fault.

req2

The example above is the requirements for an engine temperature fault monitoring system.  It defines what is monitored and the severity of the faults.  Importantly it does not define how fault detection system will be implemented.

Fault system implementation

Once the requirements are written and validated for correctness, the fault system can be implemented.

engFault

In this case, I implemented the fault detection algorithm as a Stateflow chart.  Noise in the signal was handled by using a debounce variable “delta” to bouncing between the InitETM and MoveToFault modes.

Fault system validation

The next step is to write the test cases that will validate the requirements document.  From the technical description, 6 test conditions (or cases) that can be defined

  1. Engine operating in safe temperature range:  Maps toe TD.1
  2. Engine operating above critical temperature range: Maps to TD.2
  3. Engine stays in ENGCRITTEMP state after entering ENGCRTTEMP state: Maps to TD.2.a
  4. Engine operating in unsafe temperature range for less than 5 seconds: Maps to TD.3.a
  5. Engine operating in unsafe temperature range for more than 5 seconds: Maps to TD.3.a
  6. After entering ENGOVERHEAT state engine temperature is less than maxEngTemp for more than 10 seconds: Maps to TD.3.b

In the act of writing the test cases, it is discovered that the requirements were underspecified.  The requirement reads “noise in the signal shall be accounted for” but it does not specify the level of noise.  At this point, the requirement should be updated to include information on the level of noise in the signal.

notesOnNoise.jpg

Final thoughts

Fundamentally, the process of validating fault detection systems is the same as validating any other software construct.  In addition to the manual methods of defining tests software tools such as Simulink Design Verifier can be used verify coverage of the model.

Image result for catching bugs

6 Tips for readable Stateflow charts

On the heels of a popular “5 tips for readable Simulink models” I am following up with a companion post.  While much of this material can be found in the “Stateflow best practices” document found in this sites reference section these are the 5 I find most critical.
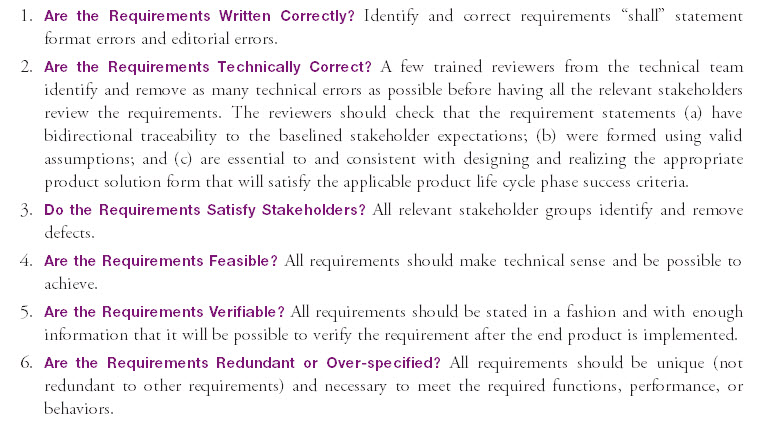
Background

First a few background concepts. The concepts of “levels” in a Stateflow Chart is a measure of how many states exist within a state.  The count starts at the highest level state and increments for each substate.

levels

Stateflow includes the model construct of a “Subchart.”  Like subsystems in Simulink, subcharts encapsulate all the states and transitions in the state into a single “masked state.”

When counting levels a subcharted state counts as one state regardless of how many states exist within the subchart.

#1 Consistency

There are two main aspects to consistency in Stateflow charts decomposition of transition information and placement of transition information.

Transition information consists of both the transition condition (or event) and the action.

corrected

The image above shows 4 methods for decomposing the transition condition and action.  In general, I recommend a separate transition for the condition and the action.  This is for two reasons.  First, for complex conditions, the length of the text can make it difficult to read; adding in additional text in the form of the action just aggravates this issue.  Second, by placing the action on a second line it is possible for multiple transitions to use the same action.

A slight modification to the previous image canc2 show the importance of constant placement.  If the placement of information is inconsistent, e.g. in some cases above and some below, left or right, it becomes difficult to associate the transition information with a given transition.

#2 Maximum states per level & maximum levels per chart

For any given State I recommend a maximum of 3 levels of depth; if more than 3 levels are required consider creating a subchart for the part of the state requiring greater depth.

levelsLikewise, I recommend an absolute maximum depth of 5 states.  The first recommendation promotes readability at any given level within the chart.  The second recommendation promotes understanding of the chart as a whole.

#3 Number of States

As a general rule of thumb, I limit the number of states that I have on any given level to between 30 and 50.  When I find the number of states at a level exceeding that value I repartition the chart using subcharts.

#4 Resize!

Even more than in Simulink, resizing states can dramatically improve the readability of the chart.  There are 3 things to consider in the size of the state

  1. Is the state large enough to hold all the text in the state
    overflow.jpg
  2. Is the state large enough to have all of the transitions reasonably spaced out (e.g. will the text on the ouput transitions be readable?)
    bigEnough
  3. Is the state larger than it needs to be?  When states are larger than required they take up valuable screen space.
    toBig

#5 Stright lines, please

In the majority of cases the use of straight lines, with junctions to help with routing, provide the clearest diagram appearance.  The exception to this recommendation is for “self-loop back” transitions such as resets.

selfLoop

#6 Temporal logic!

Use of temporal logic, instead of self-defined counters, ensures that the duration intent is clear in the chart.timverVCnt

In this example, if the time step is equal to 0.01 seconds then the two transitions result in the same action (transitioning after 1 second).  However if the time step is something other than 0.01 seconds the evaluation would be different.  Because of this when the intention is to transition after a set time temporal logic is always preferable.

Final thoughts

Again these are just a few tips on how to make your Stateflow charts more readable.  I would, as always, be happy to hear your suggestions.


Writing clear requirements

This past week I have been reviewing the NASA Systems Engineering Handbook.  As I read through it I was struck by their description of the requirements writing process.  With this post, I will share a few thoughts.

Requirement inputs

In the diagram that follows they call out four inputs to the requirements writing process.  Two out of the four are frequently missed in the development of requirements. “Baseline enabling support strategies” and “Measure of effectiveness” writtingRequirements

From the NASA document:

Baselined Enabling Support Strategies: These describe the enabling products that were identified in the Stakeholder Expectations Definition Process as needed to develop, test, produce, operate, or dispose of the end product. They also include descriptions of how the end product will be supported throughout the life cycle.

What makes this unique?  By looking at the enabling products it expands the requirement writing to the system level.  E.g. the requirement is not an individual part, it can leverage existing infrastructure.

Measures of Effectiveness: These MOEs were identified during the Stakeholder Expectations Definition Process as measures that the stakeholders deemed necessary to meet in order for the project to be considered a success (i.e., to meet success criteria).

What makes this unique?  Writing test criteria is standard for requirements (or at least it should be.)  What is unique is explicitly calling out the stakeholder requirements of success in a defined and agreed upon document.  Note, the stakeholder requirements are not how the requirement document will present the requirements.

Requirement metadata

The metadata associated with requirements is often overlooked (or ignored in the  tools that support it.)  The intent behind the metadata is to

  1. Make maintenance easier
  2. Support traceability
  3. Support project planning

reqMeta

The table above provides insight in how the objectives can be met.  First, by providing ownership information it supports the maintenance objective by removing the question of whom to contact when there are questions on the requirements.  Second, traceability is explicitly called out in this table.

Finally the project planning aspect.  In explicitly specifying the verification method, lean and level better estimates of the time required for validation can be assigned.

Validation of requirements

The final aspect I want to comment on, though the whole document is worth reading, is the validation of requirements

validateRequirents

The NASA document defines 6 aspects for validating the requirements.  What is significant is that they explicitly defining validation of requirements as a step in the development process.  Multiple times in this Model-Based Design blog I have stressed the importance of using simulation to quickly detect design errors.  However, no amount of simulation can find an error if the requirements are not correctly defined.

Final thoughts

Go take a look at the NASA systems engineering document.  It is well worth the read.

5 tips for more readable Simulink models

With this post, I will share some of the methods I have used over the years to make my Simulink models more readable.

Resize subsystems and reorder ports

Resizing subsystems is a common suggestion to making diagrams more readable.  A step beyond that is to reorder the ports so that the connections between multiple subsystems are more readable.

With this Before/After example, I have done three things

  1. Resized the source and destination blocks
  2. Changed the port order on the source block
  3. Offset the two destination blocks

MATLAB functions for equations

When I am entering in an equation into Simulink, I ask myself 2 questions

  1. Is there a built-in function for this equation (e.g., Integrators, Transfer Functions, table lookups)?  Use the built-in function
  2. Is the equation more than 3 operations long?  Use a MATLAB function.

In text form, the Pythagorean theorem is quickly recognized and understood.  When written out as a Simulink equation it takes slightly longer to understand.

Note: I do have a caveat, if the mathematical operations are series of gains, for instance when converting from one unit to another, then keeping the calculations in Simulink is fine.

Use of  Virtual busses for conditionally executed subsystems

Merging data from conditionally executed subsystems requires the use of the Merge block.  When the subsystems have multiple output ports routing the data quickly becomes cumbersome.  This can be addressed by creating a virtual bus to pack and then unpack the signals.

virtBus

Note: Using a virtual bus will allow Simulink/Embedded Coder to optimize the memory placement of the signals.  If a structure is desired, then a bus object should be defined and used.

The rule of 40, 5 and 2

When I create a Simulink subsystem, I aim to have a limited number of active blocks in the subsystem (40).  A limited number of used inputs (5) and a limited number of calculated outputs (2).

  1. Active blocks:  Any block that performs an operation.  This count does not include inports, outports, mux, demux, bus…
    1. Why: When the total number of blocks goes above 40 the ability to understand what is going on in the subsystem decreases.
  2. Used inputs: Bus signals can enter the subsystem, and only one signal off of the bus may be used.  A “used signal” is one that is actively used as part of the subsystems calculations.
    1. Why: The number of used inputs is a good metric for how “focused” the subsystem is in addressing a specific issue.
  3. The number of outputs: directly relates to the first two metrics, e.g.h, how focused the subsystem is on a specific issue.

Notes: Subsystems that are integration subsystems (see this Model Architecture post) can and should break this rule.)

Stay out of the deep end, beware of breadth

As a general rule of thumb, I recommend that models have a “depth” of 3.  Navigation up and down the hierarchy quickly can lose a reviewer.  Likewise, for given model, I recommend between 30 and 60 subsystems in total.

Image result for pool deep end

This recommendation holds for a single model.  For integration models, each “child” model should be treated as a single unit.

Final thoughts

These are just a few of the recommendations that I have hit upon in the past 18 years.  I would be curious to hear your thoughts and recommendations.

Interfacing with hardware in Model-Based Design context

Interfaces between low-level device drivers and algorithmic software have multiple unique issues.  These issues exist in traditional text-based development processes and in MBD workflows.  Let’s review the challenges and methods for meeting the challenges.

Hardware challenge

Image result for hardware challengeI decompose the hardware challenges into two categories; conceptual and technical.

Conceptual challenges

For software engineers, the concepts behind hardware interfaces are frequently a source of error.

  1. Finite resolution:  Physical hardware has a finite resolution.  A 12-bit A/D converter will not provide data at a higher resolution than 12-bits.
  2. Temporal non-determinism:  Readings from hardware, unless specifically configured to do so, are not assured to be from the same iteration of the algorithm.
  3. Corrupted data: Data from hardware sources can be corrupted in multiple methods.  The software needs to handle these corruptions in a robust fashion.

Technical challenges

The technical challenges are standard component-to-component interface issues.

  1. Data conversion: Information comes from the hardware in units of counts or encoded information.  This data needs to be converted into engineering units for use in the system.
  2. Hardware/Software interface architecture:  The method for interfacing the hardware and software components requires a stricter encapsulation than software-to-software architectural components.
  3. Component triggering: Hardware components can be triggered using one of three basic methods.  Schedule based triggering, event-based triggers or interrupt based triggers.

Addressing the hardware challenges

Understanding the hardware challenges we can now address them.  The conceptual challenges are addressed through education.

Conceptual challenges

  1. Finite resolution: Analog-to-Digital Converter Testing
    Kent H. Lundberg (MIT)
  2. Temporal non-determinism: The temporal logic of programs
  3. Corrupted data: Removing spikes from signals

Image result for hardware addresses

Technical challenges

Technical challenges are handled with education and patterns.

  • Data conversion: Data conversion is done through any number of simple algorithms, from y = m*x + b equations, table look ups or polynomials.
    scaling
  • Hardware/Software interface architecture:  Interfaces to the hardware run through a Hardware Abstraction Layer (HAL).  The HAL functions can be directly called from within the Model-Based Design environment.
    Related image
    Because the HAL is a discreet function the call to the hardware should encapsulated on a per function basis.  (Note: multiple calls can be made to the function if it is reentrant, however this tends to be less efficient)
    hardwareScaling
    The connection and scaling of the hardware is broken into 3 sub-components shown above.

    • Access to the low level device drivers
    • Data filtering
    • Data scaling
      The top level model architecture interfaces the
  • Component triggering: Hardware components can be triggered using one of three basic methods.  Schedule based triggering, event-based triggers or interrupt based triggers.  Information on how to trigger component can be found here.

Final thoughts

Well defined interfaces between hardware and software is provide clarity in communicating design intent.  The model architecture can be developed from the basic architecture proposed here, with the hardware inputs and outputs being a top level integration system.


Image result for marriage of hardware and software